
A Pod is Kubernetes’ deployable workload unit. A Node is the worker machine that supplies the environment and resources to run it. When a Pod won’t run, check which Node it was assigned to and read its events. The cause is usually one of three things: resource requests, a Node eligibility rule, or a startup dependency such as storage. Fix the layer the evidence points to.
Kubernetes Pod vs Node: the difference at a glance
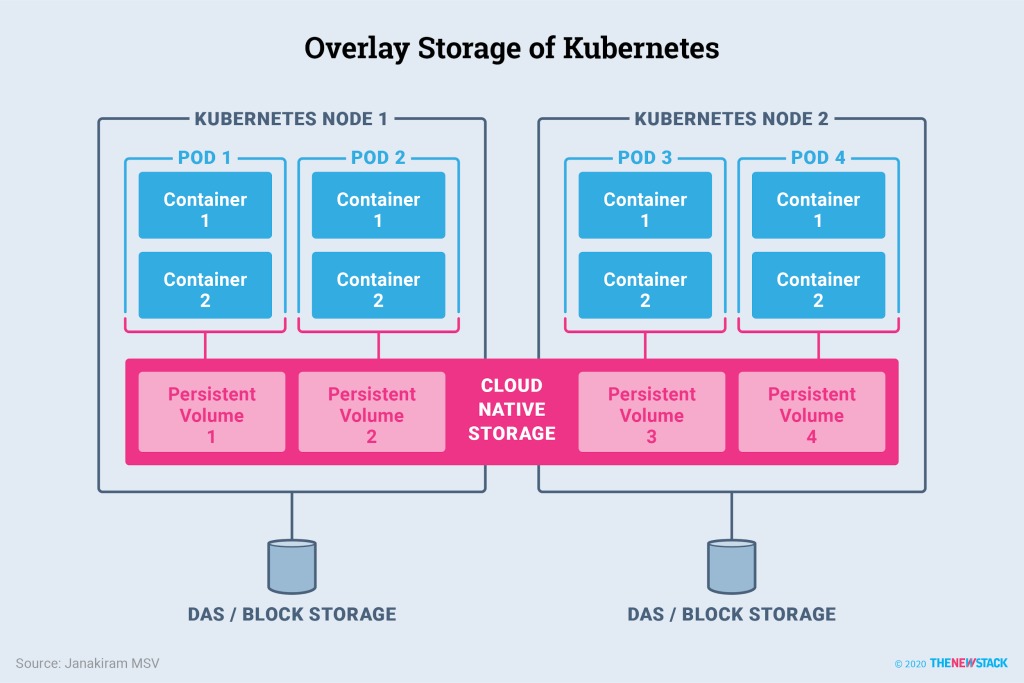
A Pod is a unit of work that Kubernetes deploys. A Node is the physical or virtual machine that runs it. One Node can host many Pods, and each Pod holds one or more containers.
| Dimension | Pod | Node |
|---|---|---|
| Role | Deployable workload unit | Worker compute machine |
| Contains | One or more containers, shared networking and optional volumes | Host resources, kubelet and container runtime |
| Created or managed by | A user or workload controller | Cluster infrastructure management |
| Scheduling | Assigned to an eligible Node | Hosts multiple assigned Pods |
| Health information | Phase, conditions and container states | Ready/NotReady, pressure conditions and resources |
| Typical problems | Scheduling failure, container startup or volume errors | Resource pressure, connectivity or host failure |
| First object to inspect | Pod status and events | Node conditions and allocatable resources |
Take a cluster running a web API and a logging agent. One Node hosts an API Pod and an agent Pod. The API Pod has an application container and a helper container that share the Pod’s network namespace. Containers in one Pod share a workload context. Separate Pods on one Node compete for its resources.
An unscheduled Pod has no Node yet. Once the scheduler binds it, the assignment names the machine responsible for running its containers.
Two read-only commands show both objects:
kubectl get nodes -o wide
kubectl get pods -A -o wide
The first lists Nodes. The second lists Pods across accessible namespaces, with a NODE column showing the assigned machine when one exists.
If containers are new to you, start with how Docker containers differ from their host environment (for Docker images, container networks, and persistent volumes). Kubernetes adds workload scheduling and lifecycle management around those containers.
How Kubernetes schedules a Pod onto a Node
The scheduler picks a Node for an unscheduled Pod. The kubelet on that Node then works with the container runtime to start and maintain the Pod’s containers.
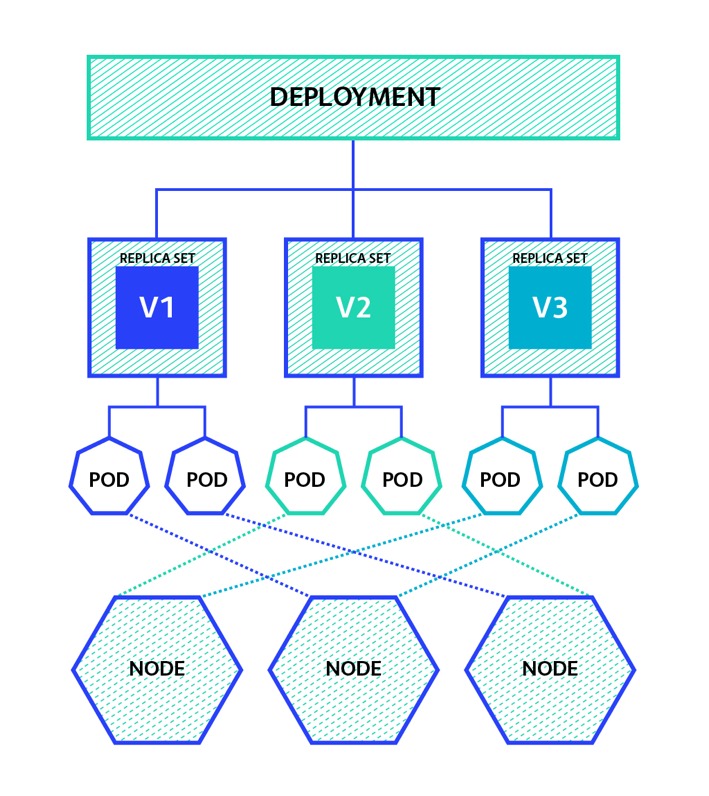
In a typical Deployment, four actors are involved:
- The workload controller creates the Pod. A Deployment manages ReplicaSets, which keep the intended number of Pods running. You can also create a standalone Pod directly.
- The scheduler evaluates Nodes. It weighs resource requests and placement rules to decide where the Pod can run.
- The Pod gets a Node. Kubernetes records the choice in the Pod’s
spec.nodeNamefield. - The kubelet runs it. The assigned Node prepares the containers and their dependencies, then reports status through Kubernetes.
Say a Deployment has three replicas. Two Pods get Nodes and the third stays unscheduled. The controller did its part, but the scheduler still has no destination for that third Pod.
A Pod stays unassigned when every candidate Node fails a scheduling requirement.
To check the assignment for one Pod:
kubectl get pod POD -n NAMESPACE \
  -o jsonpath='{.spec.nodeName}'
Replace POD and NAMESPACE with the actual names. A returned Node name is the assigned machine. An empty value means the Pod has no spec.nodeName yet.
Why free CPU doesn’t mean a Pod will fit
A Node can look mostly idle and still lack schedulable CPU for another Pod. Kubernetes tracks three separate numbers: the machine’s capacity, its allocatable resources and the requests already assigned to workloads.
Monitoring tools show CPU usage over a measurement interval. The scheduler compares the Pod’s declared requests against the request budget that remains, along with other eligibility rules.
Take a Node with:
- Allocatable CPU: 4 cores available for scheduling.
- Existing Pod requests: 3.5 cores already requested by assigned workloads.
- New Pod request: 1 additional core.
That leaves 0.5 cores of request headroom. Scheduling the new Pod would need 4.5 cores of requests against an allocatable budget of 4.
Requests drive scheduling and resource allocation. Limits cap runtime resource use, and how they’re enforced depends on the resource. A CPU limit does a different job from the CPU request used during placement. Memory follows the same split: requests and usage diverge, and resource pressure can affect the application while it runs.
The Kubernetes resource management documentation explains how requests, limits and allocation relate.
To see the scheduler’s resource picture for a Node:
kubectl describe node NODECheck Allocatable and Allocated resources, especially the requested CPU and memory totals, and compare them with the new Pod’s requirements. kubectl top shows live usage when a metrics source is running. describe node shows what the scheduler counts.
GPU requirements, Pod-count limits and other scheduler filters can also exclude a Node on their own.
Node affinity, taints and volumes: three ways placement can fail
Spare resources make a Node a candidate. Placement rules decide whether the Pod may use it.
- Node selectors and affinity: Required Node labels must match the Pod’s placement requirements. Preferred affinity steers the choice among eligible Nodes without necessarily excluding the rest.
- Taints and tolerations: A Node’s taints repel Pods. A matching toleration lets the Pod be considered, and resource and placement rules still apply.
- Persistent-volume topology: A volume can have locality or attachment limits that keep its Pod off an otherwise suitable Node.
Say a Pod requires the Node label disk=ssd. A Node without that label is out, even with spare CPU and memory.
Storage adds another restriction. A Pod can require a persistent volume whose placement rules clash with the Node picked by the workload’s affinity configuration.
One Longhorn user ran into this with dedicated storage Nodes, worker Nodes and an LLM Node. Adding affinity rules produced an event that listed several separate exclusion categories.
If I create a test pod without any affinity rules, then the pod picks a node (e.g. a worker) and happily creates a PVC and longhorn manages this correctly. The moment I add an affinity rules (e.g. run ollama on the LLM node, create a pod that needs a PVC on the worker nodes only), the pod gets stuck in “pending” state and refuses to start because of: “0/8 nodes are available: 1 node(s) had untolerated taint {node-role.kubernetes.io/control-plane: }, 3 node(s) had volume node affinity conflict, 4 node(s) didn’t match Pod’s node affinity/selector. preemption: 0/8 nodes are available: 8 Preemption is not helpful for scheduling.”
The author later traced the problem to indentation under the YAML values entry. After fixing it, the example worked.
To see the Pod’s effective placement settings, inspect its YAML:
kubectl get pod POD -n NAMESPACE -o yamlCompare its nodeSelector, required affinity, tolerations and referenced persistent-volume claims with the target Node’s labels, taints and volume topology. Redact cluster-specific values before sharing the output.
The Kubernetes taints and tolerations documentation describes how these controls affect eligibility.
A Pending Pod: a safe, fast diagnostic route
Pending covers two situations. An unassigned Pod may be waiting for the scheduler. An assigned Pod may be waiting for images or storage while its containers are prepared.
Read the Pod’s events:
kubectl describe pod POD -n NAMESPACEThe output shows the assigned Node, relevant conditions, container information and an Events section with the reasons for the Pod’s current state.
| Observation | Inspect first | Look next at |
|---|---|---|
No assigned Node; FailedScheduling event | Resource requests and scheduler exclusions | Eligible Nodes and placement constraints |
| Node assigned; image or container waiting events | Container startup and image messages | Kubelet and runtime dependencies |
| Node assigned; volume mount or attachment events | Volume-related messages | Storage availability and topology |

In a February 2025 Discuss Kubernetes post, an operator reported 0/176 nodes are available for a Pod that would not schedule, despite an apparently unused machine.
The event listed 14 insufficient-CPU, 14 insufficient-memory and 14 GPU-related exclusions, plus 34 Node affinity or selector mismatches and six volume-affinity conflicts. The operator wanted to know why one particular Node was excluded. The thread never found a root cause.
Who controls placement when you can’t edit the Pod?
A controller-generated Pod inherits its configuration from the workload that manages it, and admission policies can also change the effective Pod spec. With read access you can spot an unsuitable placement rule even if you can’t change the controlling template or cluster policy. Find the direct owner by kind and name:
kubectl get pod POD -n NAMESPACE -o jsonpath='{range .metadata.ownerReferences[*]}{.kind}/{.name}{"\n"}{end}'Then identify the matching workload or policy owner. For a Deployment-managed Pod, the direct owner is typically a ReplicaSet. Follow that ReplicaSet’s owner reference to the Deployment before editing its Pod template.
What happens to Pods when a Node fails?
A Pod’s Node assignment is part of its lifecycle. When that machine fails, a controller typically creates a replacement Pod that can be scheduled on an eligible Node. The checks for uptime alerts, incident response, and restore tests are explained in the website reliability diagnosis and recovery playbook.
Restarting a container inside a Pod, replacing a Pod object and replacing the underlying Node are three different operations. They affect different Kubernetes objects and treat application state differently.
A Deployment running a web service creates a replacement when a replica disappears. The scheduler then has to find a Node with the required resources and dependencies.
A standalone Pod has no controller-managed replicas, and local or persistent storage requirements can limit what a replacement can access. Even a replacement that receives a Node can stay unavailable if a required volume can’t be attached or mounted.
For controller-managed workloads, check desired and available replicas:
kubectl get deployment DEPLOYMENT -n NAMESPACECompare the two counts. A gap means recovery is incomplete, and the associated Pod states show where.
Scale Pods or Nodes? Find what’s actually short
Pod scaling and Node scaling fix different shortages. Which one you need depends on whether the application needs more replicas, the cluster needs more capacity, or a placement rule blocks scheduling.
A Horizontal Pod Autoscaler adjusts replica demand based on its configuration and available metrics. Node autoscaling changes machine capacity when a compatible provisioner and its policies allow it. Adding replicas creates more Pending Pods when the cluster has no room. Adding machines fixes a real capacity shortage when the new Nodes meet the workload’s requirements.
| Symptom | What to try | Check |
|---|---|---|
| Too few application replicas; eligible Node capacity exists | Workload or HPA scaling | Replica demand and scaling configuration |
| Insufficient request headroom; suitable Nodes can be provisioned | Node scaling | Available Node types, policies and workload compatibility |
| Required labels, taints or volume topology cannot be satisfied | Authorized configuration correction | Specific failed placement requirement |
| Very rapid creation of short-lived Jobs | Job lifecycle and object-churn investigation | Cleanup, workload design and infrastructure limits |

Memory isn’t the only limit. In one Reddit post, an operator dedicated a Node with approximately 1 TB of RAM to a particular workload. Their controller launched short Jobs, but active, completed and Pending Pods piled up.
We have a controller pod which itself can trigger new jobs. Some jobs run for 1-3 seconds, but the kubelet is not keeping up with cleaning the pods and a lot of new jobs (100+) are left on `pending` as it is already running with 30 active jobs and 220 completed (but not deleted). How can I configure the kubelet to delete pods as soon as they are completed/finished? If I raise the limit of pods to 1000 we will have even more jobs on `pending` state?
1,000 Pods was the operator’s target, not a Kubernetes limit. Pod count, CNI allocation, Job objects and cleanup operations can each become the bottleneck.
Before changing scale, check whether the workload already has an HPA:
kubectl get hpa -AThen find the Node autoscaler or provisioning mechanism your platform uses.